Introduction to SnapGene
If you're new to SnapGene this brief guide will help you get started.
Introduction to the Interface
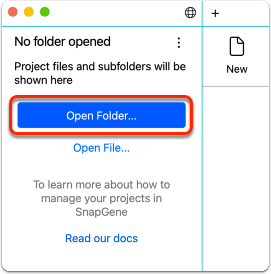
You will see the Get Started screen when opening SnapGene for the first time. From this screen, you can Open a file or project folder, access Recent projects or files and find plenty of Videos and user guides to help you get started. Anytime you want to return to this screen, you can do so easily by clicking the Get Started link at the bottom of the screen.

Click Open Folder to add a new Project folder or Open File to open a file from your computer in the main SnapGene interface.
The main SnapGene interface has a Top menu from which you can access all SnapGene's functionality. Toolbars on the Top and Side provide quick access to the tools you use most often. The bottom Tabs show alternative views of your sequences, annotations and history, where you can see your DNA construct's graphical and textual history.
On the far left is the Project sidebar, which displays all the files for that project, and a search box to quickly find and filter the files you need. Click the disclosure ">" buttons to expand or collapse folders and subfolders.
For more information about using the SnapGene interface, visit our User Guide.

Working with Files and Folders
Open a Project Folder
Click Open from the Get Started screen to locate and select the folder you wish to work with. A Project can be any folder on your computer. Confirm open to set the folder as a Project. The contents of the Project folder will appear in the Project sidebar and the recent projects list.
Open and View a File
To view the contents of a file quickly, click once on the file name in the Project sidebar. Double-click to open a file and keep it open in a tab. The file name will become a non-italicized text. You can open multiple files by double-clicking each file name. Each file you open will display in a new tab.

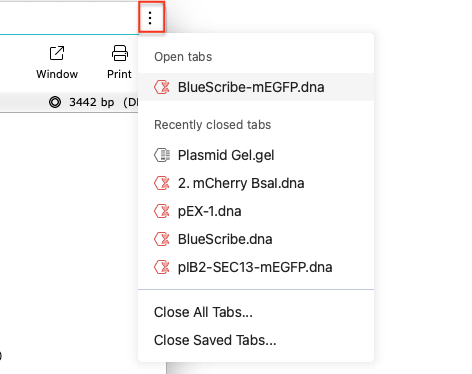
To close a tab, click the X on the tab. The Ellipsis in the top right corner lets you see a list of all your open tabs so you can easily switch between them, close them or reopen recently closed files as a new tab.
Create a File
You can create a New file directly from the Get Started screen, from the File menu or by clicking the New Tab + button and choosing your desired file type.

Type or paste your sequence into the text field and indicate whether it is linear or circular. SnapGene will automatically detect common features and show a preview of the file.

Import a File
Import files directly from the Get Started screen or the File menu. The import option allows direct access to many online resources. You can select plasmids from the SnapGene online database, choosing from over 2,700 annotated sequences, including all common plasmid cloning vectors. Save them for later or open them directly into SnapGene.
For more information about import, visit our User Guide.

Using Annotations
SnapGene offers three basic annotation types on DNA sequences - enzymes, features, and primers. Each menu contains all the tools you need to create, edit, and display each annotation type.
Enzymes
By default, SnapGene displays enzyme sites that appear once in your double-stranded DNA sequence and have a six or more base pair recognition site. Restriction enzymes that only cut once are in bold.
Use Enzymes > Choose Enzymes to remove enzyme sites individually or all at once. Use the search field or filter by enzyme set to add individual enzymes.
You can quickly hide some or all enzymes without removing them via the Hide button in the sidebar or by selecting them from your chosen enzyme set.
For more information about Enzymes, visit our User guide.

Features
SnapGene comes pre-loaded with hundreds of commonly used features found on plasmid vectors and will automatically detect and add homologous features to any new DNA sequence. The Features > Detect Common Features option allows you to detect, select and add common features to your sequence. You can also create new features by highlighting the relevant area on the plasmid map or the sequence view and choosing Features > Add Feature. As with enzymes, you can quickly toggle features on and off in both map and sequence view. To see a complete list of the features in your sequence, click the Features tab. Here, you can sort features, toggle to a compact view, or hide individual features.
For more information about Features, visit our User Guide.

Primers
You can create new primers via the sequence view. Click and drag to select your DNA sequence. SnapGene will automatically calculate the length and predicted melting temperature of your oligo.
Click Primers > Add Primer to add your selection as a new primer. Primers on opposing strands are clearly indicated in both sequence and map views.
As with other annotations, you can toggle primers On and Off from the sidebar and view a complete list of the primers in your sequence via the Primers tab. SnapGene can also automatically design PCR primers when running operations under the Actions menu.
For more information about Primers, visit our User Guide.

Using the Actions Menu
The Actions menu contains tools for simulating laboratory procedures before you carry them out. Each comes with pre-selected default options and the choice to customize a reaction to suit your needs.
SnapGene will display tabs specific to your chosen method and provide step-by-step instructions for you to follow. Any flaws in your design will be identified so you can correct them.

Using the Tools Menu
The Tools menu contains various tools for analyzing sequences and verifying your results.

Align to Reference DNA
You can use SnapGene's Align to Reference DNA sequence tool to align Sanger reads to a reference sequence and verify your clonal sequence is correct.
You can view your reads alongside each other or expand the view to see the chromatogram sequence. Align additional sequences by dragging and dropping into the align with window.
For more information about Align to Reference visit our User Guide.

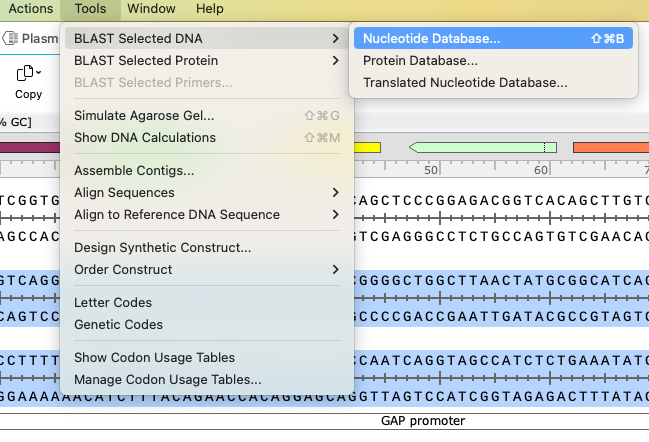
BLAST
You can apply the BLAST tool to learn more about a gene or sequence. Select the area of interest and the relevant database. Your chosen sequence will automatically load to the appropriate NCBI BLAST query page, and you can access the necessary information.
Simulate Agarose Gel
SnapGene allows you to simulate agarose gels. You can select your buffer, choose the number of lanes, and change the agarose percentage.
Click on the lane marker to choose what goes in each lane. Choose your ladder from the standard options. SnapGene will automatically include the uncut version of your selected sequence. You can choose from the list or directly on the map to select restriction enzymes. The digested DNA fragments display as they would on the gel.
You can also show PCR products by selecting the primers similarly.

Setting Your Preferences
All SnapGene preferences are accessible via the Edit menu or, if you're using a Mac, via the SnapGene menu. Alternatively, you can navigate directly to the specific section through its related menu.

You can change the background and default window size, set how often your local SnapGene checks for updates, and select preferred file types. There are options for determining enzyme appearance in the map and sequence view, selecting your parental enzyme set, or choosing your preferred enzyme suppliers. SnapGene allows you to dictate the length and minimum melting temperatures for simulated primer binding and gives you a series of default options for protein display. You can even set display options for traces and alignments that help with accessibility.
For more about preferences, visit our User Guide.
Recommended Resources