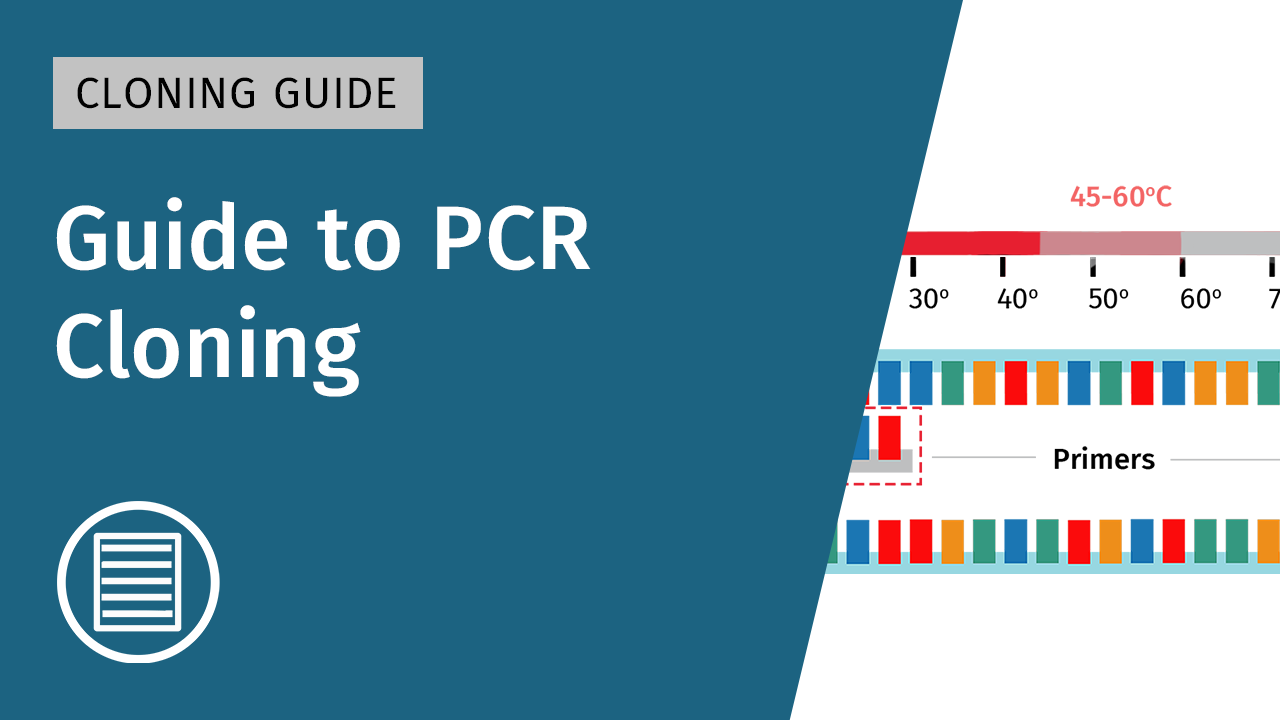
Polymerase Chain Reaction
Learn the fundamentals of the polymerase chain reaction (PCR).
What is PCR?
PCR is one of the most widely adopted molecular biology methods in labs around the world. With PCR, specific regions of DNA are exponentially amplified through the use of thermal cycling and heat tolerant DNA polymerases.
The reaction was the brainchild of Kary Mullis, who first applied the technique along with colleagues in 1985 to amplify the β-globin gene. Mullis described the method in greater detail in a Methods of Enzymology publication and was later awarded the 1993 Nobel Prize in Chemistry in recognition of his efforts.
Components of PCR
PCR requires just 5 key components:
- DNA template
- Primers
- DNA polymerase
- dNTPs (nucleotides)
- Reaction buffer

DNA Template
DNA, either single or double-stranded, is the standard template for PCR. The source of DNA can include genomic DNA (gDNA), complementary DNA (cDNA) or plasmids.
Primers
PCR primers are designed as pairs, referred to as forward and reverse primers. These primers anneal to complementary regions of single-stranded DNA. Once bound to target regions, PCR primers enable DNA polymerase to attach and extend the new sequence.
DNA Polymerase
The type of polymerase commonly utilized in PCR is known as Taq DNA polymerase. Named after the thermophilic bacteria Thermus aquaticus from which it was originally extracted, Taq polymerase can work efficiently at high temperatures.
You can learn more about the attributes of DNA polymerases below.
dNTPs (Nucleotides)
To create new strands of DNA during the PCR there must be available deoxyribonucleoside triphosphate (dNTP) bases - adenine, thymine, cytosine and guanine.
Reaction Buffer
The PCR reaction buffer contains essential elements required for a successful reaction including magnesium ions (Mg2+), which is a cofactor for DNA polymerase.
How does PCR work?
A typical PCR is composed of the following steps:
- Step 1: Initial denaturation
- Step 2: Denaturation
- Step 3: Annealing
- Step 4: Extension
The denaturation, annealing, and extension (steps 2–4) steps form the PCR cycle, which is repeated multiple times to increase the amount of final PCR product.
Step 1: Initial Denaturation
Double-stranded DNA is first heated to around 94°C for a few minutes.
The high temperature denatures hydrogen bonds that hold the complementary bases together, therefore forming two single strands of DNA.
The larger the DNA template, the longer the initial denaturation phase is. For example, gDNA contains more bases and hydrogen bonds compared with cDNA; therefore gDNA requires a longer initial denaturation time to ensure the double-stranded DNA is dissociated.

Step 2: Denaturation
At the start of each PCR cycle, the sample is heated to around 94°C, this time for just a few seconds. This step ensures the newly formed PCR products are denatured back into single-stranded form.
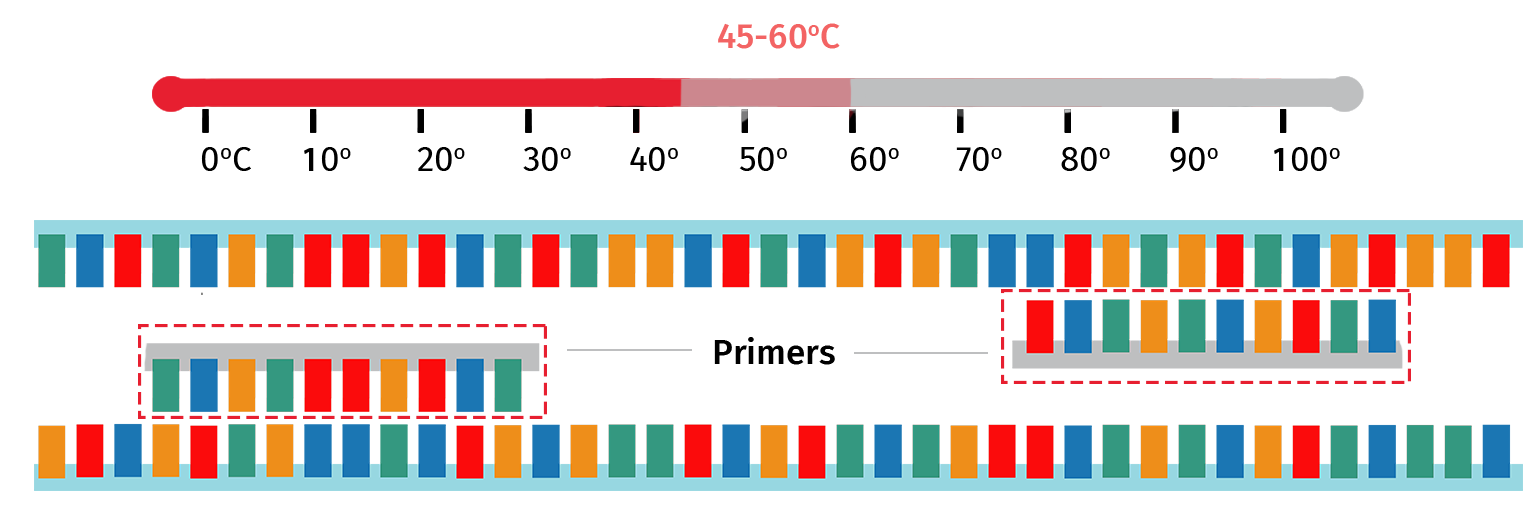
Step 3: Annealing
With the target template now single stranded, the sample is then cooled to 45–60°C to enable the PCR primers to anneal to their complementary regions on the template.
The exact annealing temperature will vary depending on the primer properties. For example, PCR primers that are longer in length will typically require a higher annealing temperature compared with primers that are shorter in length.
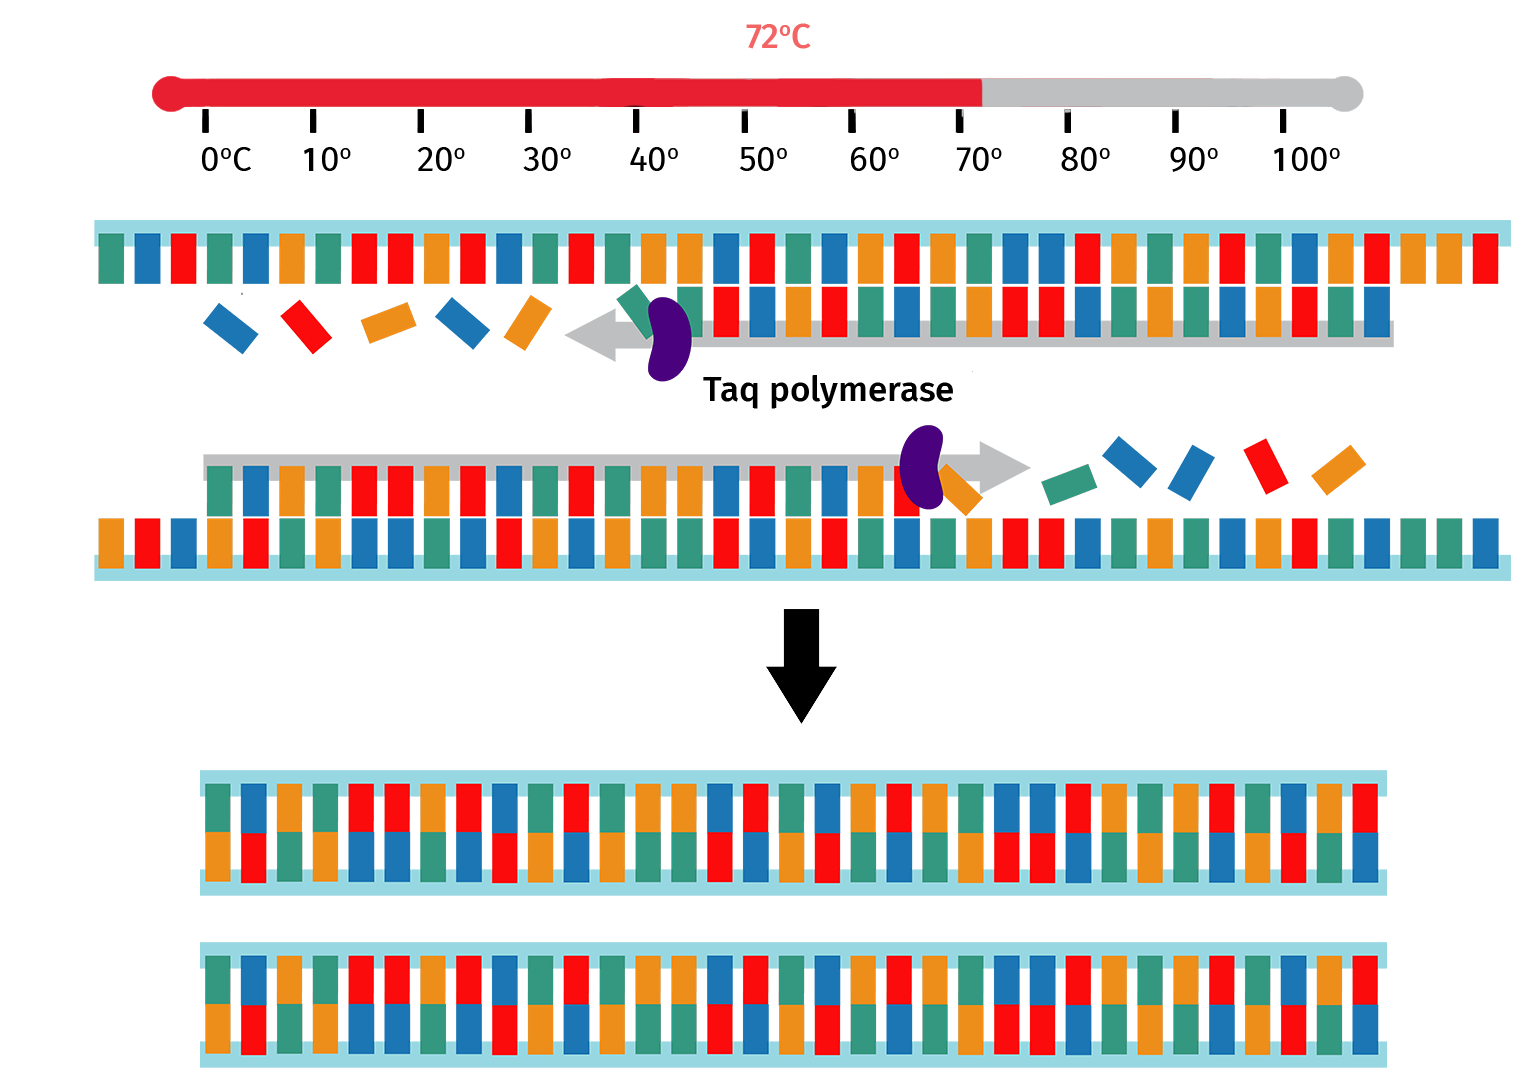
Step 4: Extension
The sample is then heated to 72°C, which is the optimal temperature for Taq polymerase to backfill from the bound primer 3' ends.
At the end of the extension step, the number of PCR product copies will have doubled since the start of the PCR cycle.
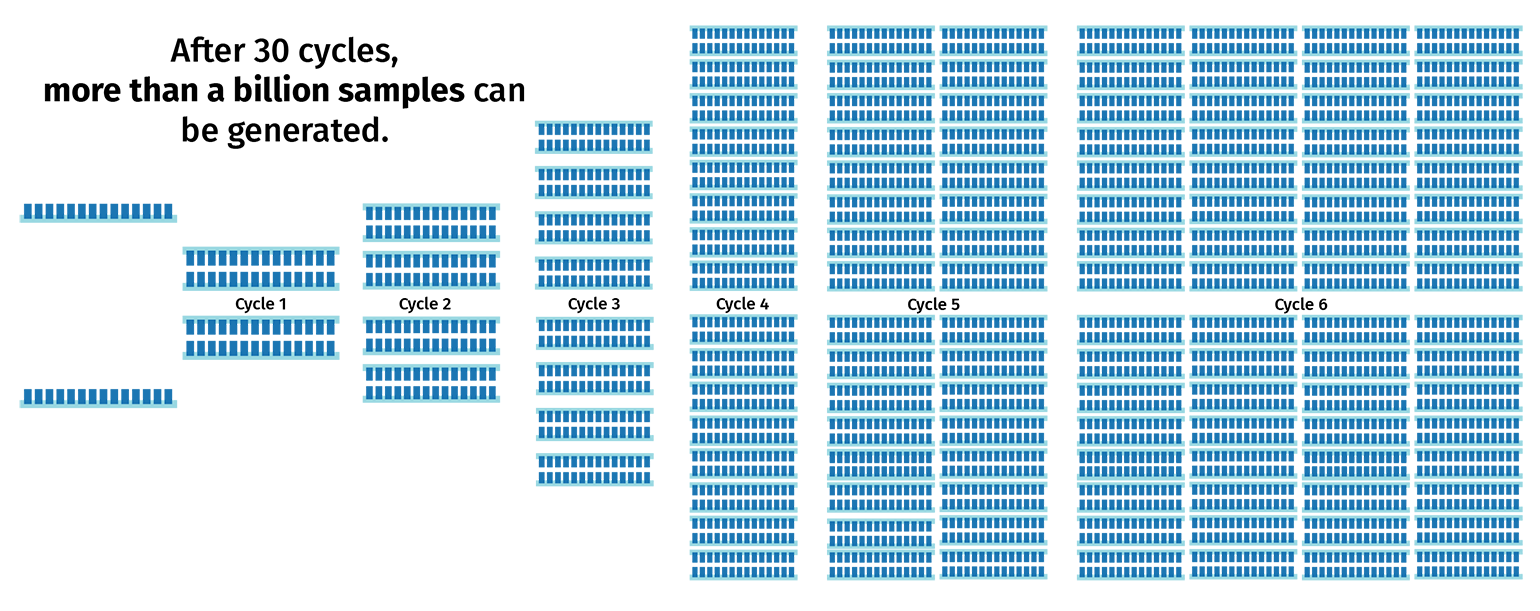
The PCR cycle (steps 2–4) is then repeated, usually 30–40 times, to increase the amount of DNA copies. With each cycle, the number of product copies doubles. This means that a PCR with 30 cycles will create more than 1 billion copies of product from a single template!
DNA Polymerase: The 4 Key Attributes
There are various types of DNA polymerase commercially available, each with their own unique properties. It’s therefore important to consider the PCR application with the 4 key attributes of the polymerase:
- Thermostability
- Specificity
- Processivity
- Fidelity
In some cases, it may be more appropriate to use a mixture of different polymerases to optimize the thermostability, specificity, processivity, and fidelity requirements.
Thermostability
The thermostability of DNA polymerases is defined by how long they remain active at the extreme range of temperatures used in PCR.
There have been various thermostable polymerases identified to date, each with its optimal temperature for activity and a unique half-life profile at temperatures greater than 95°C. For example, the half-life of Taq polymerase at 95°C is 40 minutes, whereas the half-life of the hyperthermophilic Deep Vent DNA polymerase extracted from the Pyrococcus species GB-D is several hours at 98–100°C.
Specificity
Specificity of the PCR is measured by non-specific amplification of unintended targets. Both DNA polymerase and the PCR primers contribute to the overall specificity of the reaction.
When Taq polymerase was first extracted and analyzed by Alice Chien and colleagues in 1976, it was noted that the enzyme is active across a range of temperatures (~40–80°C). This broad temperature activity profile can actually hinder the specificity of the PCR. For example, mispriming and premature target amplification of undesired products can sometimes occur during the reaction set-up at room temperatures.
One way to increase the specificity of DNA polymerase and the PCR is to use a hot-start Taq. A hot-start Taq mixture commonly contains a polymerase that is bound to an antibody, which inhibits the activity of Taq at temperatures lower than 90°C. During the initial denaturation step of PCR, the high temperature causes the antibody to dissociate from the polymerase, therefore enabling Taq activation.
Processivity
Polymerase processivity is defined as the number of consecutive nucleotides a single enzyme can incorporate before being dislodged from the DNA template.
At 75°C, native Taq polymerases can typically amplify DNA at a rate of 10–45 nucleotides per second - that’s approximately 2 kilobases per minute!
Some DNA polymerases have been engineered to improve their binding domain, thus making them more stable than conventional Taq. For example, KAPA2G polymerase has a speed of ~150 nucleotides per second - 3-fold higher than Taq.
Improving polymerase processivity is beneficial for amplifying long PCR products (e.g. greater than 10 kilobases) and helps to drive the reaction through GC rich stretches of DNA or regions that possess high degrees of secondary structure.
Fidelity
Fidelity refers to how well the DNA polymerase can accurately replicate the desired template, without the introduction of errors.
Previous analysis of Taq polymerase suggests that it has a total error rate of 1.8 x 10⁻⁴ - so for every 10,000 bases incorporated by Taq, there is expected to be at least 1 error (base substitutions, deletions, insertions etc). The relatively low fidelity of Taq is associated with its lack of 3’ to 5’ exonuclease proofreading capabilities.
For applications that require accurate PCR cloning of long sequences, it’s recommended to use a high-fidelity polymerase. These polymerases, such as Pfu and Q5®, have proofreading activity that results in 1–2 orders of magnitude higher fidelity than Taq.
Applications of PCR
PCR is a versatile technique that has been utilized in many molecular biology applications, including:
- Cloning
- Mutagenesis
- Genotyping
- Gene expression analysis
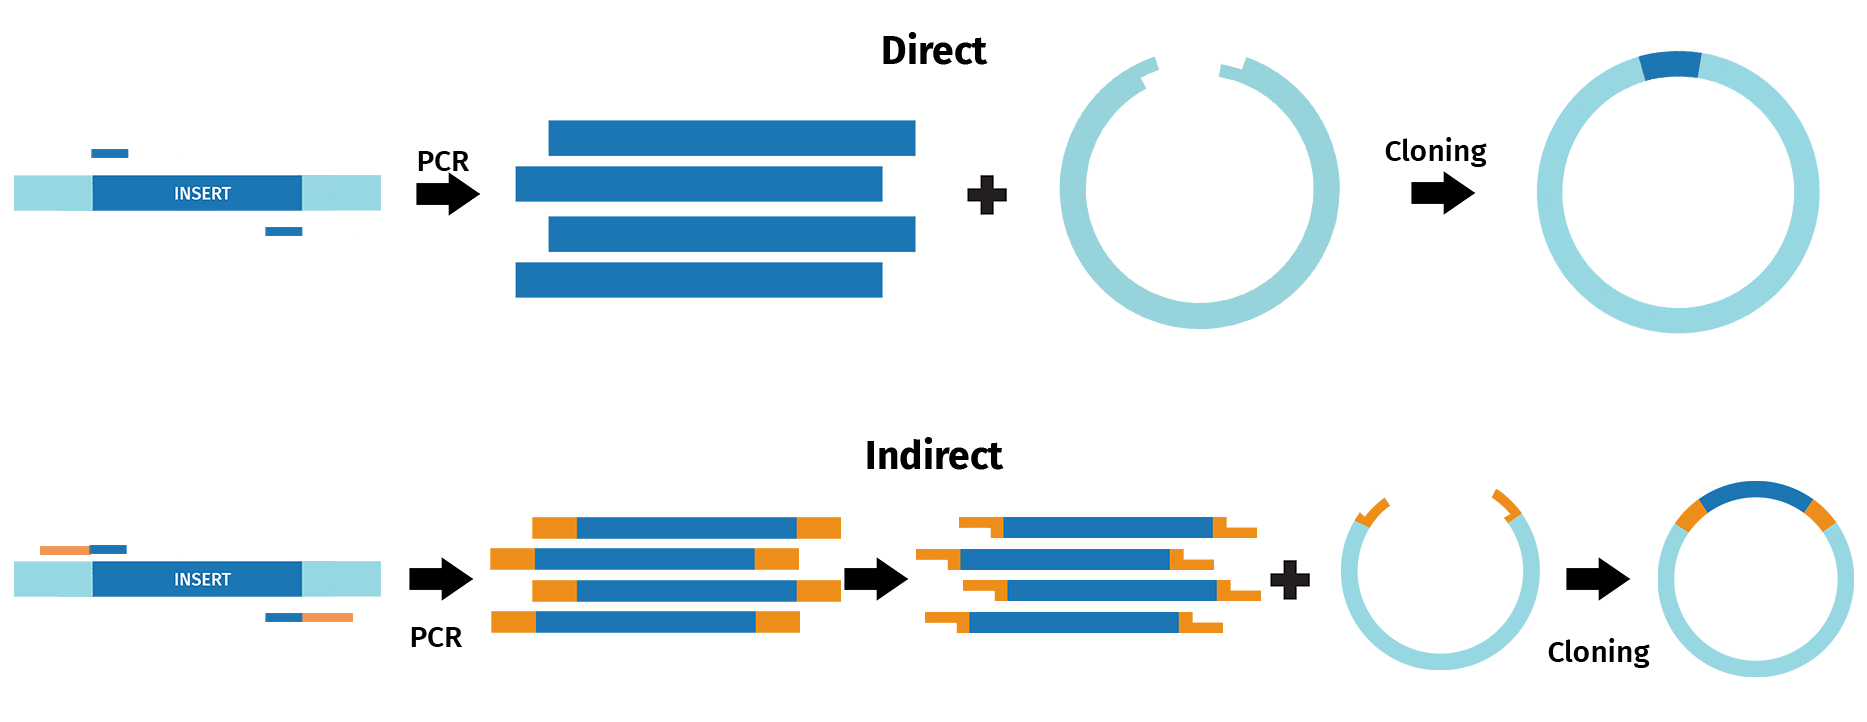
Cloning
Various cloning approaches have adopted some form of PCR to either directly or indirectly recombine DNA fragments.
Direct PCR cloning methods include TA and GC cloning, as well as TOPO® Cloning, and enable direct cloning of PCR fragments. For example, the TA cloning approach takes advantage of the 3’ A overhang naturally added to products by Taq polymerase following PCR. The resulting sticky ends then enable recombination with DNA fragments containing 3’ T overhangs, such as linearized vectors.
During indirect PCR cloning, the PCR products are modified prior to recombination with other DNA sequences. For example, in restriction cloning, restriction sites are frequently introduced via PCR to enable restriction digestion and ligation with linearized vectors.
With SnapGene, you can design and simulate a range of cloning procedures that incorporate a form of PCR.
► Learn to simulate TA and GC Cloning in SnapGene
► Learn to simulate TOPO® Cloning in SnapGene
► Learn to simulate restriction cloning in SnapGene
Mutagenesis
PCR mutagenesis is a technique used to generate site-directed sequence changes such as base substitutions, inserts and deletions.
To insert a single point mutation via mutagenesis, for example, PCR primers are designed that contain the desired base change, usually in the middle of the primer sequence. PCR is then performed with the mutagenic primers and a high-fidelity DNA polymerase, which results in the incorporation of the desired mutation into the original sequence.

In SnapGene, you can design mutagenic primers and simulate a mutagenesis reaction.
► Watch how to simulate mutagenesis in SnapGene
Genotyping
Allele-specific PCR is used to detect sequence variations and ultimately determine the genotype of an organism.
For allele-specific PCR, primers are designed to flank the region of interest. For example, when creating a knockout mouse, primers are used to target the wild-type and transgenic gene regions. You can then determine the success of the knockout experiment by analyzing the PCR products on an agarose gel.
With SnapGene, you can simulate an agarose gel electrophoresis to predict the number and size of the PCR product bands following PCR and restriction digestion.
► Watch how to simulate agarose gel electrophoresis in SnapGene
Gene Expression Analysis
The most common application of PCR is gene expression analysis through quantitative PCR (qPCR), also known as real-time PCR (RT-PCR).
For a two-step qPCR, RNA containing messenger RNA (mRNA) transcripts are firstly converted to complementary DNA (cDNA) via reverse transcription. The resulting cDNA is then used as a template for qPCR. PCR primers are designed to amplify sections of transcripts from a gene of interest. During qPCR, the amplification of the transcripts is detected in real-time through a fluorescent signal, which can then be used to determine the initial gene expression of the target.

With SnapGene, you can plan qPCR experiments by designing primers and simulating a PCR.
► Watch how to design primers and simulate PCR in SnapGene
Variations of PCR
There are some techniques that are adaptations of conventional PCR, including overlap extension PCR and inverse PCR.
Overlap Extension PCR
Overlap extension PCR, also known as splicing by overlap extension, is a versatile technique that is commonly used to fuse multiple DNA fragments together in a seamless reaction.
The reaction is split into 3 separate PCRs: extension, overlap and purification.
- Extension PCR: Primer pairs introduce overlapping ends between adjacent DNA fragments
- Overlap PCR: The products from the extension PCR are then used in another PCR to join the overlapping PCR products
- Purification PCR: Primers that bind to the end of the first and last DNA fragments are used in a new PCR to amplify the fused product
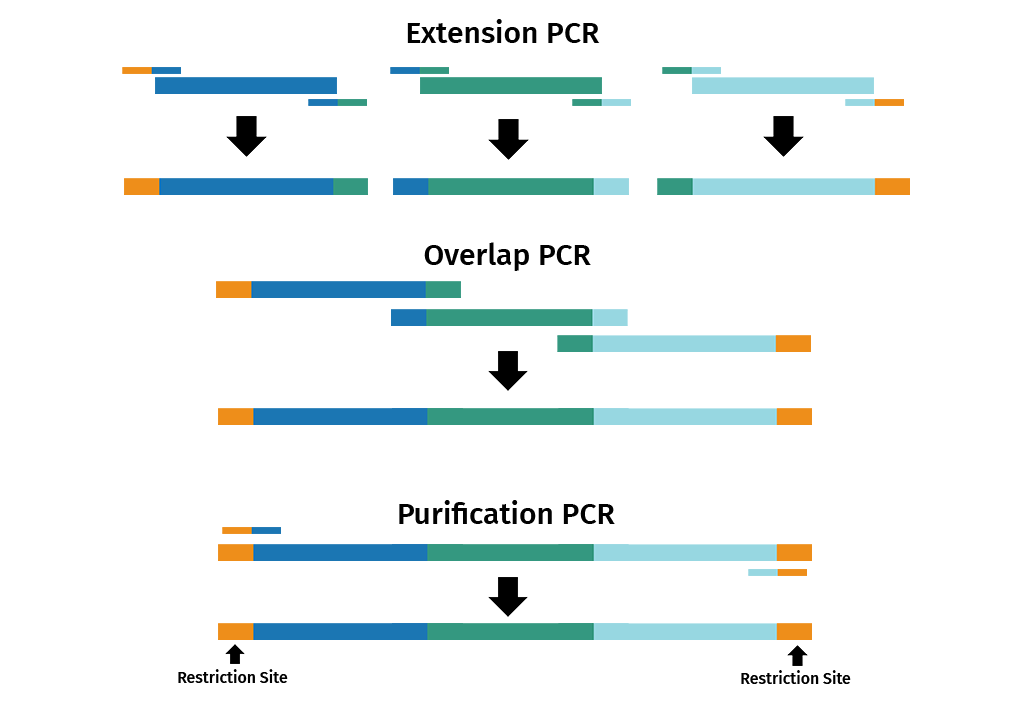
It is also possible to introduce site-specific mutations via overlap extension PCR by using mutagenic primers.
SnapGene can help you design primers for overlap extension PCR and simulate a reaction.
► Learn more about overlap extension PCR
Inverse PCR
Inverse PCR is used to amplify regions of unknown DNA sequences, which are adjacent to known sequences, through the use of outward-facing primers.
An example of inverse PCR is cloning unknown sequences. A region of DNA containing a known sequence flanked by an unknown sequence is prepared and circularized. After circularization, the known sequence is used as the source for the primer to enable inverse PCR. The resulting PCR product can then be ligated into a cloning vector, isolated, and sequenced.
You can use SnapGene to design primers for inverse PCR and to simulate the fragment circularization.
► Learn more about inverse PCR
Tips for Successful PCR
Avoid Contamination
PCR is a very sensitive technique that is prone to contamination with unwanted nucleic acids such as gDNA.
Below are a few simple ways to help you reduce the chance of PCR contamination.
- Always clean your pipettes and working environment with a decontamination solution, such as DNAZap™, before setting up a PCR
- Always use PCR-grade water to prepare your PCR mixtures
- Always use pipette tips that contain aerosol-resistant filters
- Separate your working environments into zones; set up PCR mixtures in one room, and pipette the template in a separate room
- Aliquot your PCR reagents and PCR primers into working volumes
- Avoid using PCR reagents for non-PCR work
Create a PCR Master Mix
When setting up a PCR experiment involving multiple reaction wells, it’s useful to prepare a master mix containing the DNA polymerase, reaction buffer (i.e. dNTPs, salts, etc), and primers. The master mix is created in a single tube and is then aliquoted into the desired number of reaction wells. It’s then a case of just adding the desired template into each well.
A master mix ensures the PCR components are equally distributed amongst the different wells. You will also save time when using a master mix, compared with pipetting each component separately into each well.
To account for pipetting variations when preparing a master mix, it’s also recommended to create 10% more mixture than you require. For example, if you have 100 wells to prepare for, then create a master mix to cover 110 wells.
Confirm the Optimal Annealing Temperature with Gradient PCR
When designing PCR primers with computational tools, such as SnapGene, the estimated primer melting temperatures are calculated. In turn, it’s possible to estimate the PCR annealing temperature by using the primer melting temperatures.
The estimated annealing temperature will vary depending on the DNA polymerase used in the PCR:
- Most DNA polymerases: Annealing temperature is generally 0–5°C lower than the primer melting temperature
- Proofreading DNA polymerases (e.g. Phusion®, Phire®, Q5®): Annealing temperature is 6–12°C higher than the primer melting temperature
Of course, this is the theoretical PCR annealing temperature. There are other factors that can influence the annealing temperature of the reaction, such as primer concentrations and the reaction buffer composition. Therefore, it’s advised to use a gradient PCR when optimizing the annealing temperature for newly designed primer pairs.
A gradient PCR is when the same PCR cycle conditions are used, but the annealing temperature is altered between sample wells. Most thermocyclers have a heating block that can enable a gradient PCR. When performing a gradient PCR, it’s advised to use a temperature range that spans 5°C either side of the estimated annealing temperature.
► How to estimate the PCR annealing temperature
Ensure the Template is Free from PCR Inhibitors
When extracting and preparing template DNA for PCR, you want to ensure that it is free from compounds that inhibit the PCR.
Common examples of PCR inhibitors that may be present in template solutions include:
- Proteins
- Ethylenediaminetetraacetic acid (EDTA)
- Ethanol
- Ionic detergents (e.g. sodium dodecyl sulfate [SDS])
Avoid Adding Too Much Template
Adding too much DNA template into a PCR can actually inhibit the reaction. Therefore, you should always adjust the template input depending on the type of DNA you have.
The following can be used as a guide to determining the input of template DNA for PCR:
- Complementary DNA: 1–100 ng
- Genomic DNA: 5–50 ng
- Plasmid DNA: 0.1–10 ng
Remember, PCR is a very sensitive technique, so it’s generally safer to add a lower concentration of DNA template than you think rather than too much.
Online Primer Design Tools
Recommended Resources