What is Restriction Enzyme Cloning?
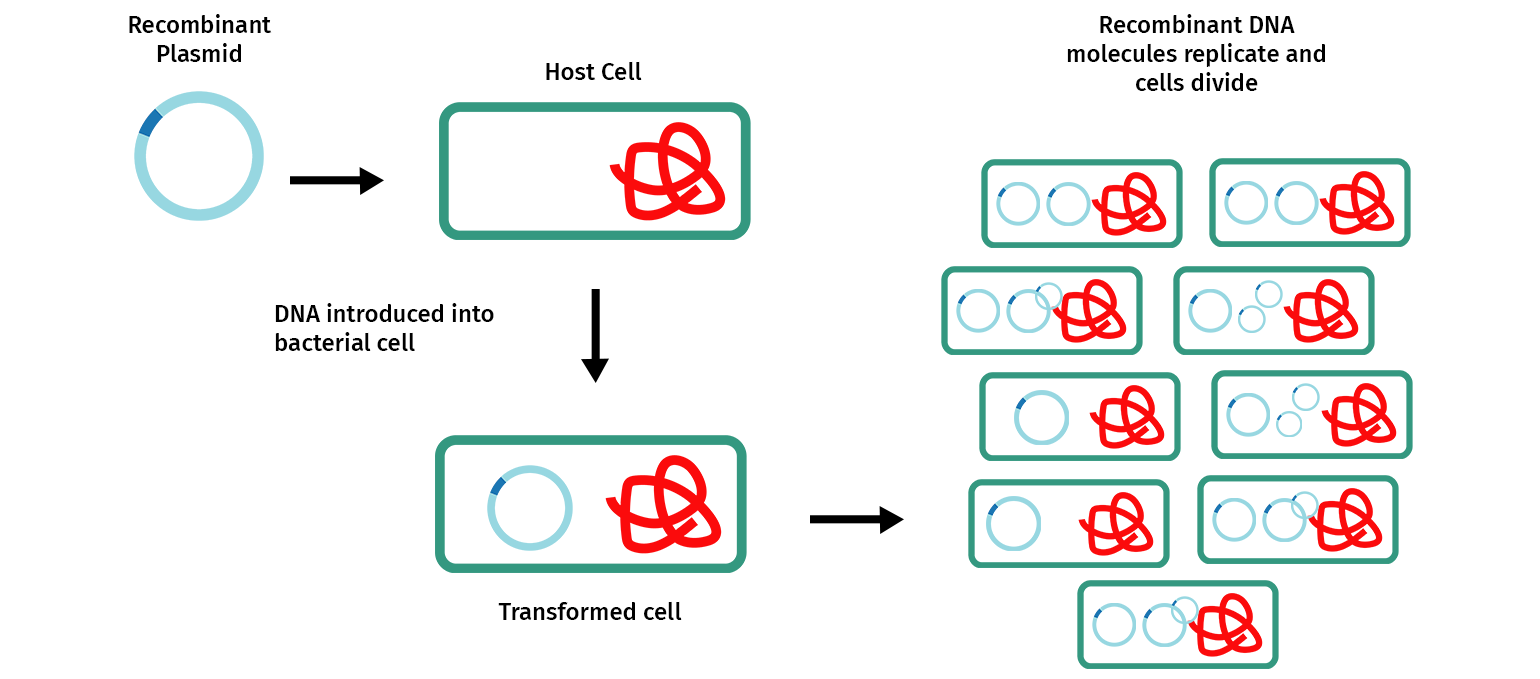
Molecular cloning involves making multiple copies of a DNA fragment to enable it to be more easily studied and manipulated. Most commonly, cloning is achieved by inserting one or more DNA fragments of interest, often referred to as “inserts”, into a circular self-replicating DNA called a plasmid vector. When the joined plasmid/insert is introduced into a bacterium, the circular plasmid/insert replicates to create hundreds of identical “cloned” copies per cell.
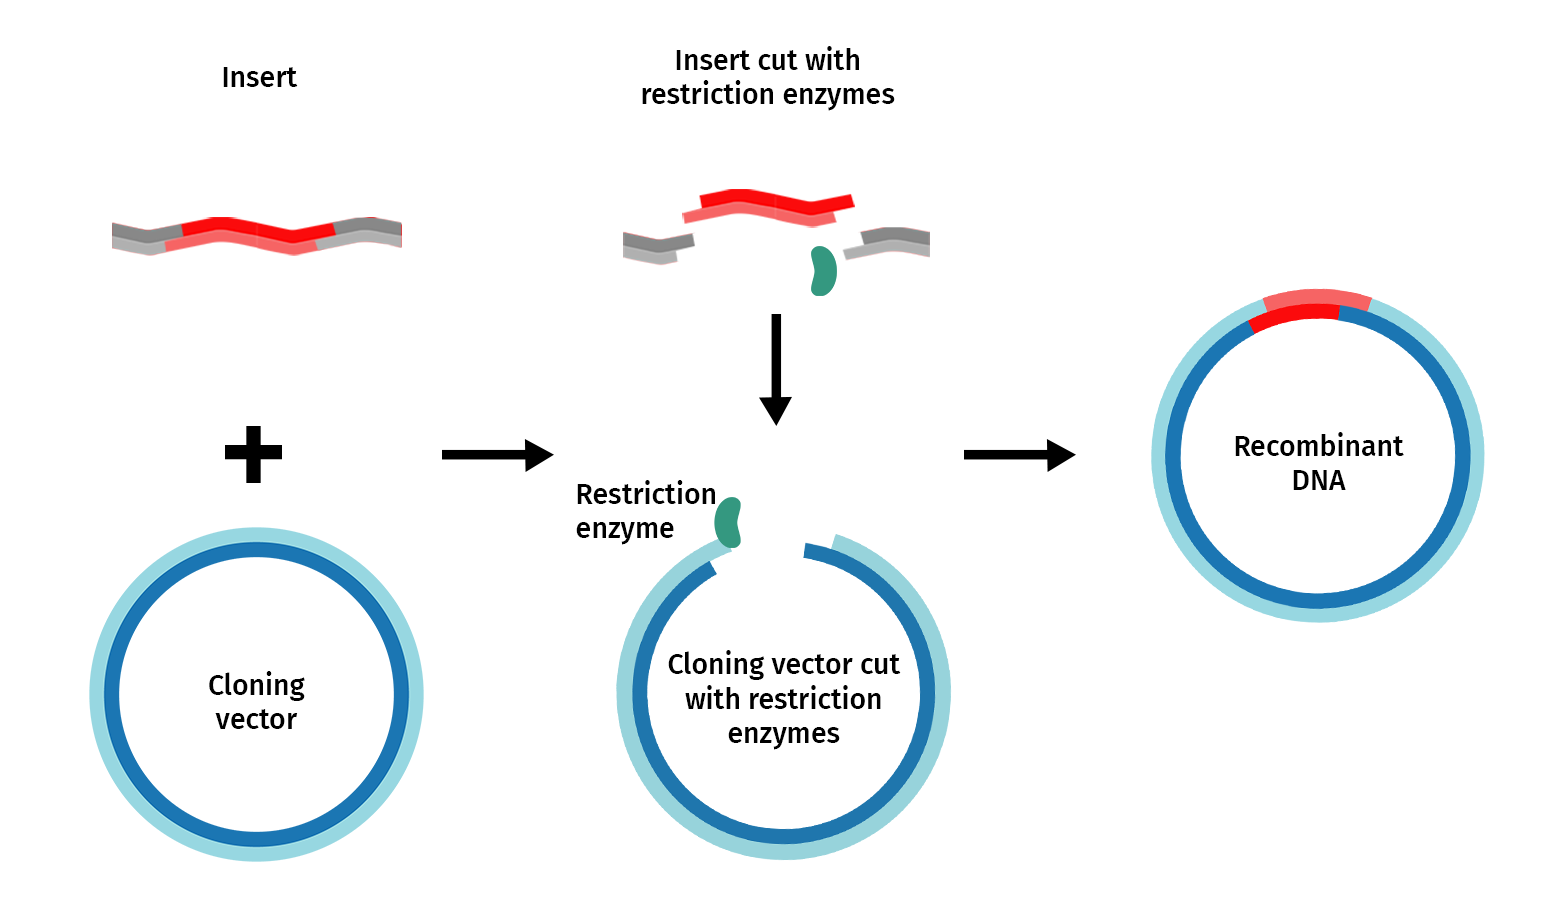
Restriction enzyme cloning, or “restriction cloning,” uses DNA restriction enzymes to cut a vector and an insert at specific locations so they can be easily joined together by the enzyme DNA ligase to create recombinant DNA.
History and Applications of Restriction Cloning
Prior to the 1970s, scientists were not able to easily isolate and study individual genes. The first advance was the discovery of restriction enzymes and the DNA ligase enzyme. This key discovery, coupled with the description of scientific protocols, enabled scientists to use these tools to isolate individual genes from a genome.
The second major advance in the field was the development of plasmid cloning vectors that could be used to receive and replicate isolated pieces of DNA. The development of these tools led to the publication of the first recombinant DNA molecules in 1972.
Genes are cloned so that the proteins they encode can be expressed at high levels and purified for medical, experimental or commercial applications.
- Human insulin was cloned and expressed in bacteria in 1978.
- The CRISPR enzyme Cas-9 is cloned in many organism-specific vectors that allow CRISPR based genome editing to be applied in those organisms.
- Cloned genes are introduced into plants to improve their resistance to a pathogen or toxic chemical in their environment.
Cloning and subcloning with restriction enzymes has been the dominant technique in molecular biology for many years. In fact, more than 70% of all molecular biology experiments begin with the restriction cloning of DNA fragments.
► Watch an Introduction to Molecular Cloning video series
Planning a Restriction Cloning Experiment
Selecting a Vector System
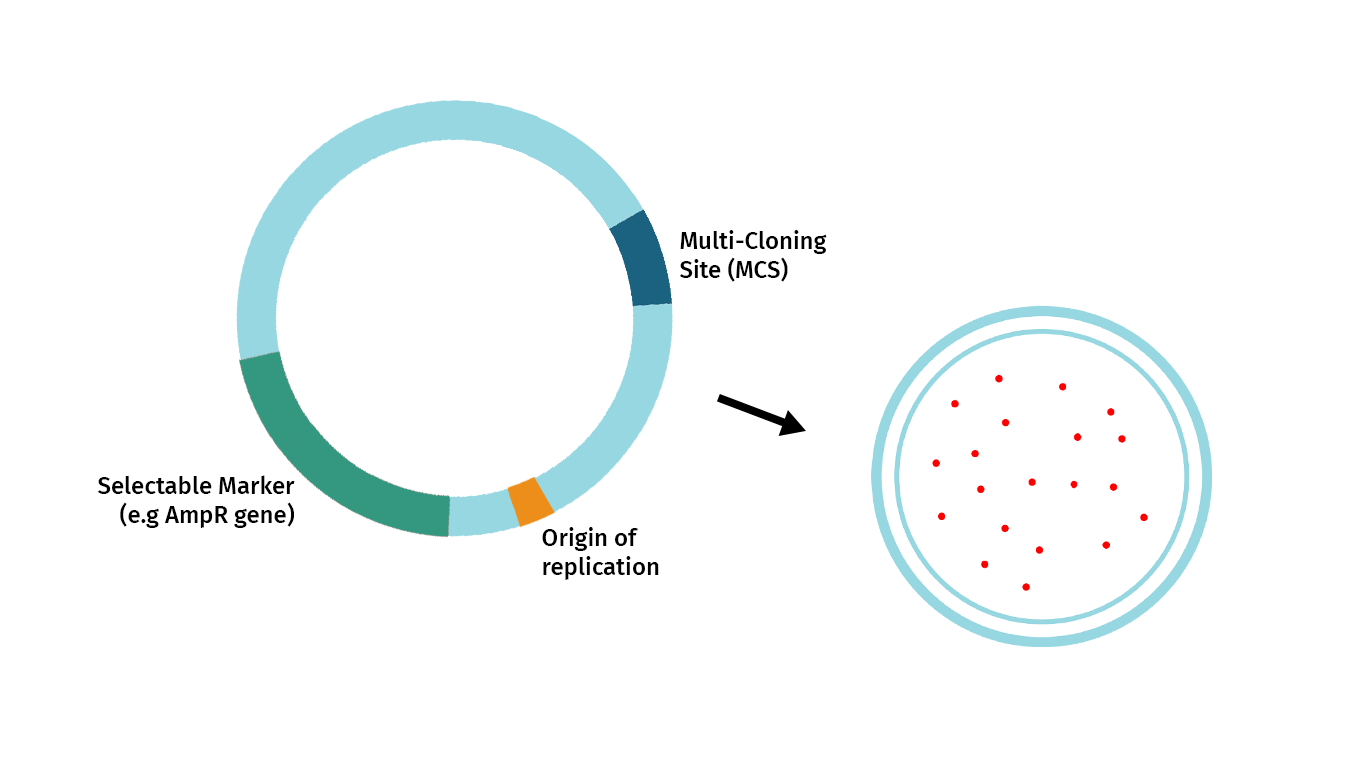
The plasmid below illustrates the essential features required of a restriction cloning vector. These are:
- Origin of Replication: The origins of replication allow the cloned DNA to replicate independently of the genome.
- Selectable Marker: The selectable marker allows selective growth agents to guarantee that growing cells contain the vector. In bacteria, most selectable markers are antibiotic resistance genes.
- Convenient Insertion Site: When cloning with restriction enzymes, the most common entry point for your fragment of interest is a Multi-Cloning Site or MCS. An MCS is a cluster of unique restriction enzymes that offer multiple enzyme choices for introducing your fragment of interest.
- Cloning Selection Marker: A marker that signals the vector contains inserted DNA.
Vector choice also depends on downstream plans to manipulate the plasmid and the host organism selected for expression of the molecular clone. Many plasmids are preconfigured to accept a fragment of interest and add various functional components to it, such as peptide tags for purification, subcellular targeting sequences, or fluorescent tags to aid in visualizing where your protein is expressed.
Types of Restriction Enzymes
Type IIP restriction enzymes have long been the workhorses of molecular biology as they always bind a specific sequence and cut at the same location, no matter the source of DNA.
Three main types of restriction site overhangs or ‘ends’ are generated by these cuts:
- 5’ protruding ends produce a 5’ stretch of unpaired DNA sequence
- 3’ protruding ends produce a 3’ overhang of unpaired DNA sequence
- Blunt ended cutters produce no overhangs
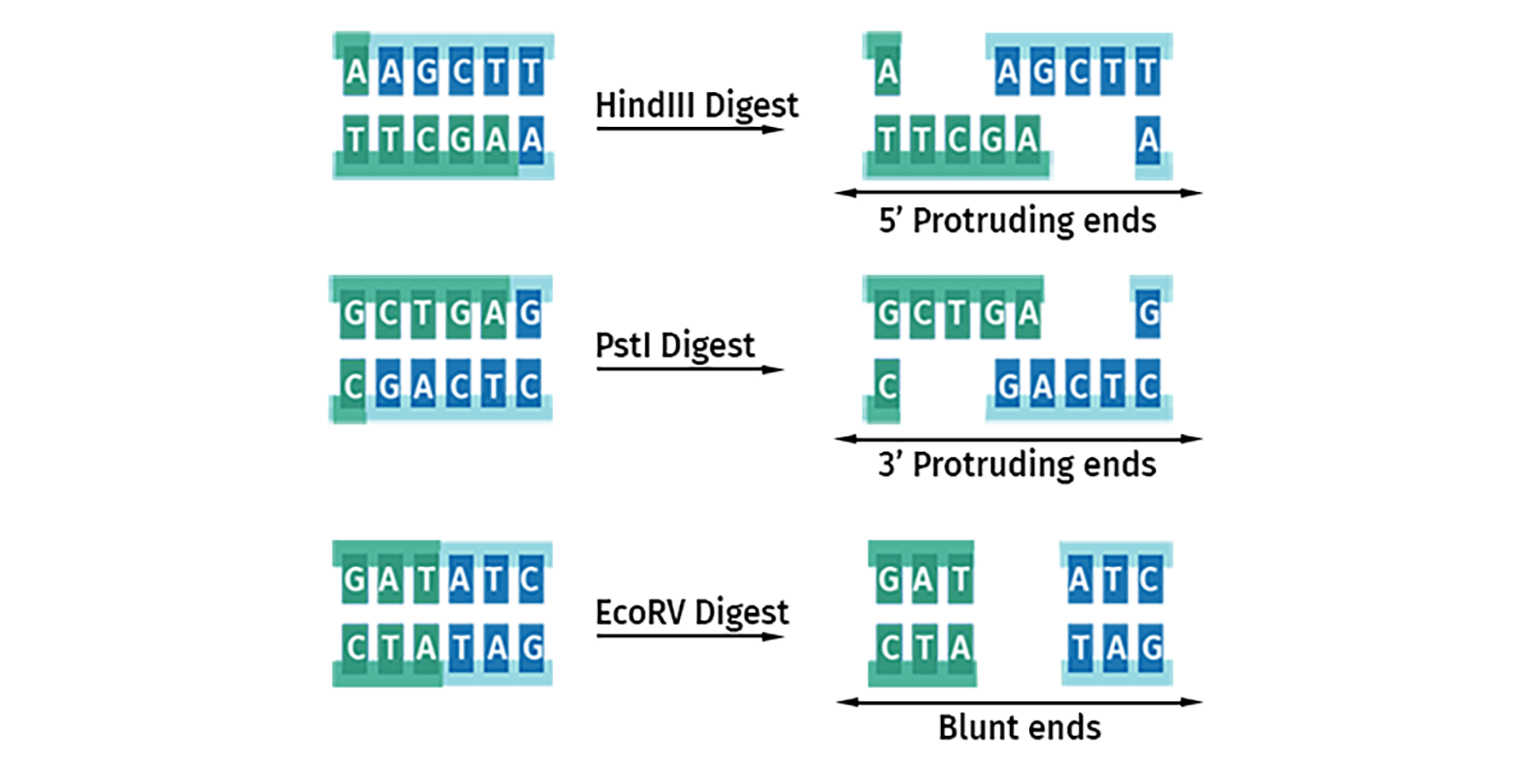
Once cleavage has occurred, the ends of the DNA become substrates for DNA ligase. DNA with protruding or ‘sticky’ ends will join to compatible ends to form stable Watson-Crick base pairs. All blunt ends are compatible with each other.
Single or Dual Enzyme Cloning
Single or dual restriction enzyme cloning strategies can be used depending on the cloning sites available and the importance of correct orientation of the insert.
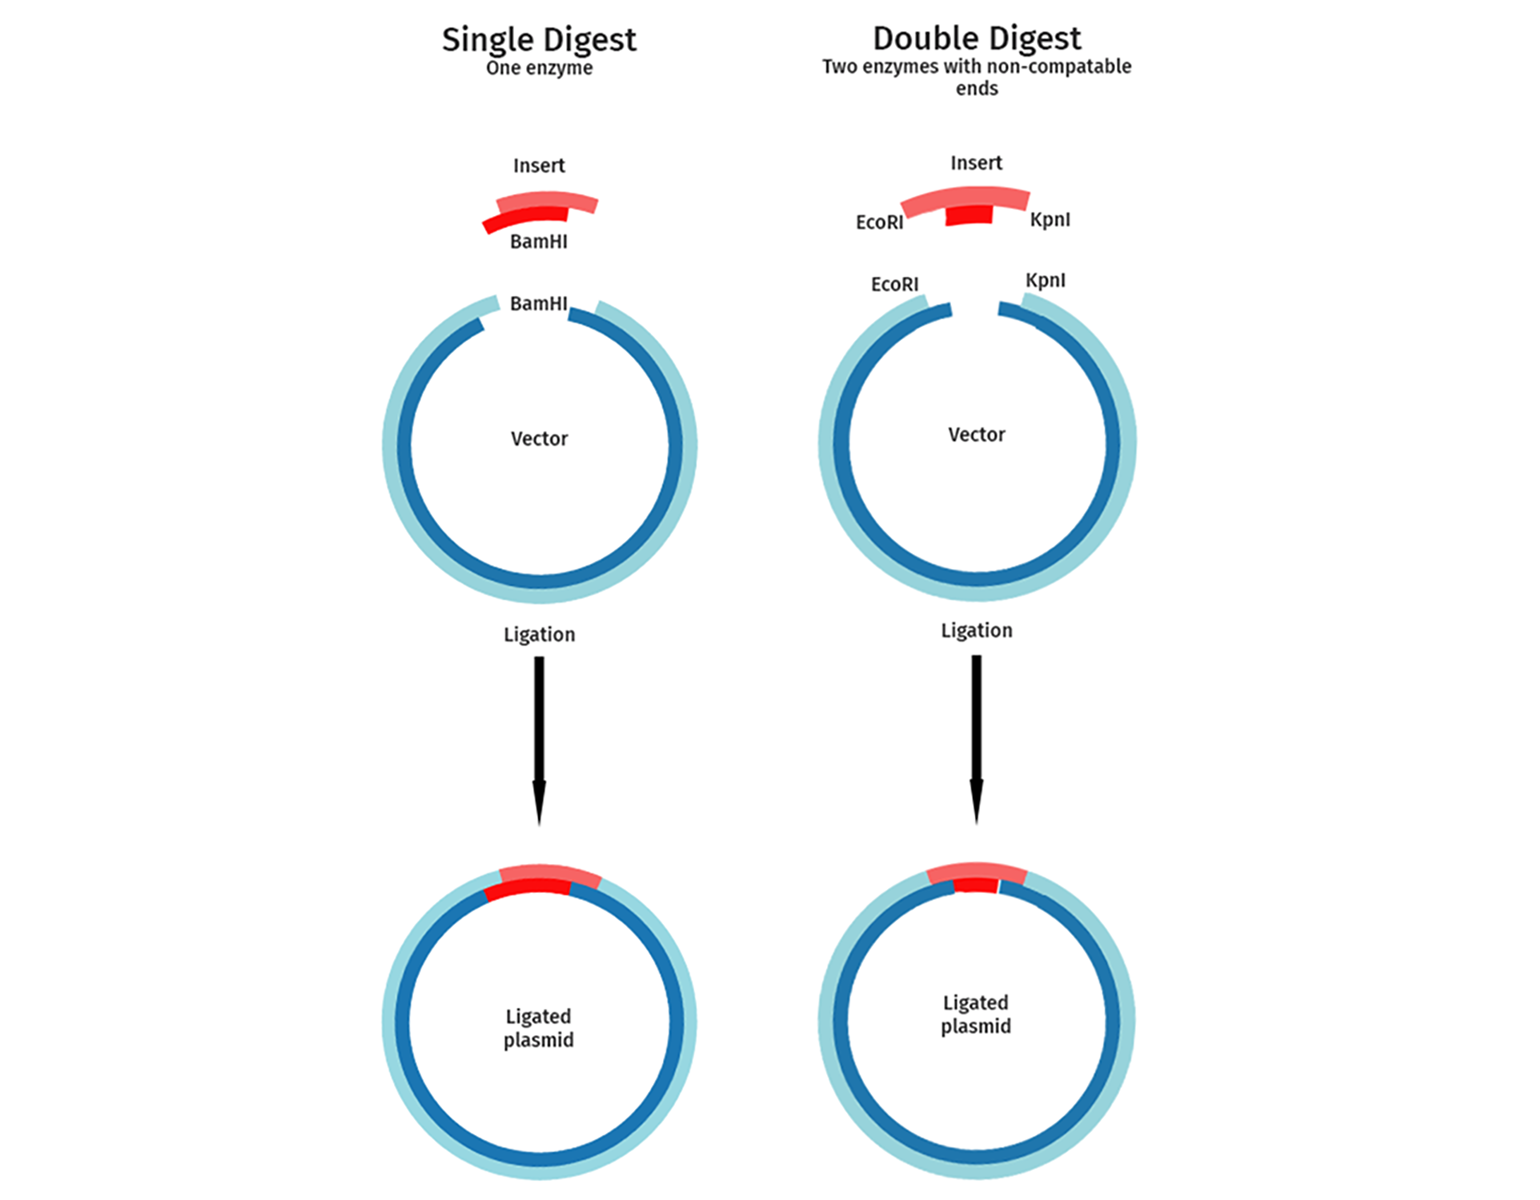
In single enzyme cloning, the vector and insert are cut with a single restriction enzyme. This is used for experiments where the orientation of the DNA fragment to be cloned is not important. A typical example of this is when cloning a genomic DNA library or a cDNA random cleavage library. Single restriction digests aim to isolate many different fragments of a given genomic DNA or cDNA.
Dual enzyme or directional cloning uses two different enzymes. Directional cloning guarantees that your inserted fragment is introduced in the orientation you choose and reduces background colonies resulting from a linear vector closing up on itself. Examples include the directional cloning of a gene or a cDNA into a vector.
Enzyme Location
The relative location of the enzymes to the end of your linear DNA molecule is also important. The majority of enzymes require 4 to 6 base pairs adjacent to the recognition site to stabilize the DNA for efficient cleavage. If two enzyme sites are too close together, one or both enzymes might not cut efficiently.
Pros and Cons of Restriction Enzyme Cloning
What are the main strengths of restriction enzyme cloning of DNA sequences?
There are many advantages to restriction enzyme cloning:
- There is a rich set of resources for this method, ranging from protocols to commercial and academic resources such as vectors and bacterial systems.
- It’s widely known and studied—the method is taught from high school through to universities.
- There are widely available restriction enzymes with different recognition sites and potential overhangs.
- There are a lot of software solutions available to help you with your designs and experimental planning.
What are the main limitations of restriction enzyme cloning of DNA sequences?
As popular as restriction enzyme cloning is, there are some disadvantages:
- The method can be time-consuming and involves many steps performed over several days.
- Particular care must be taken if designing an experiment for in-frame expression studies.
- It is crucial that your choice of restriction enzymes result in a correctly oriented insert in your vector.
When should I use restriction enzyme cloning?
The following are example uses cases when you may want to use restriction enzyme cloning:
- You want to take advantage of a wide range of vectors and expression systems for your experiments.
- You want to demonstrate that you can successfully use the most widely used cloning approach in molecular biology.
- You want to have the freedom to plan and construct clones based on your experimental designs.
- You want to easily reuse your clones to build more complex constructs as your experimental needs grow.
7 Tips for Successful Restriction Enzyme Cloning
- Carefully choose your combination of enzymes to make sure they cut uniquely within the insert and the vector.
- If you are designing for an expression experiment, make sure your planned insertion is in-frame with the N- and C-terminal elements of the vector that you will be using.
- Perform directional cloning whenever possible.
- Band purify your fragments and accurately quantitate your material on a NanoDrop. Band purification is the most effective way to ensure that close to 100% of small fragments and any uncut vector are eliminated from your reactions.
- Span a few insert: vector molar ratios when ligating. Most ligations do well in the range of 2:1 to 3:1 with blunt end ligations and very small inserts performing better at higher molar ratios of 10:1 to 20:1. You can easily calculate how much DNA you need to achieve your desired molar ratio by using one of several online molar ratio calculators.
- Make sure your ligation buffer is fully thawed and mixed.
- Sequence verify critical regions of your molecular clone.
Simulating Restriction Cloning in SnapGene
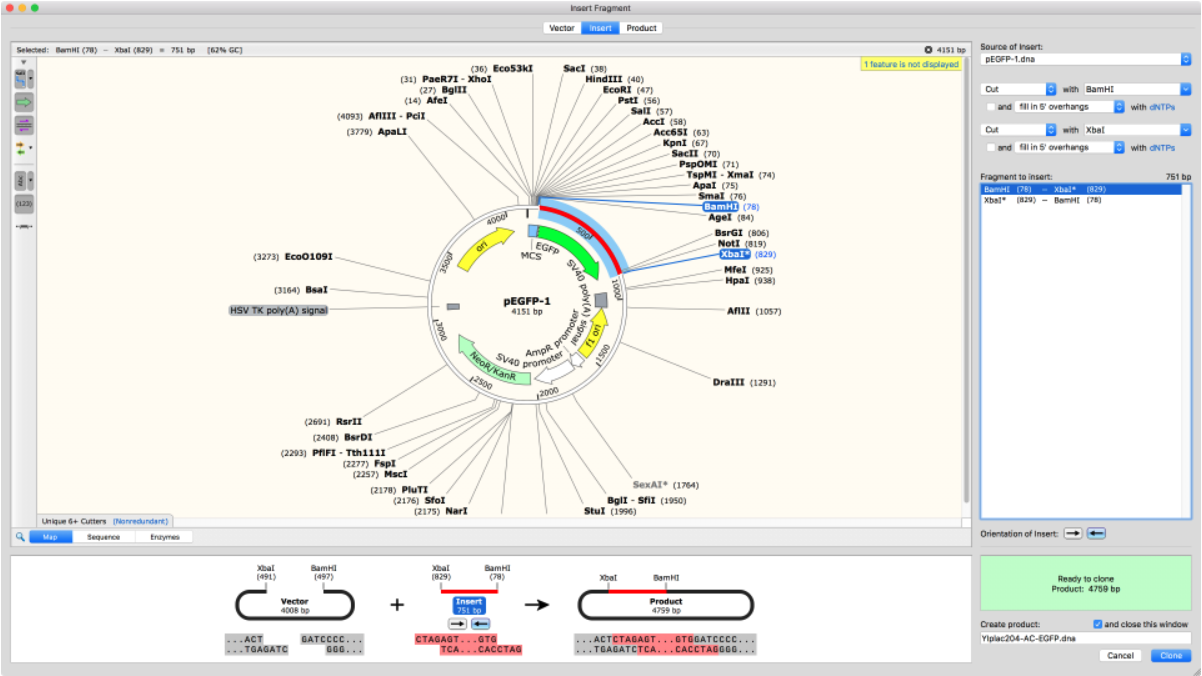
SnapGene allows you to accurately design and simulate restriction cloning procedures. Test complicated projects, catch errors before they happen, and obtain the right constructs the first time.
Import Plasmid Maps
SnapGene comes with thousands of plasmids in its database which can be easily added directly into your cloning experiment. Alternatively, plasmid sequences can be copied and pasted into the software or imported from Addgene or other online sources.
Once imported, there are many annotation options to visualize and verify all plasmid elements, including protein-coding elements.
►Learn how to import plasmids into SnapGene
Plan and Visualize Your Cloning
The simple interface and specialized cloning tools in SnapGene ensure fast, accurate construct design. Easily select and view restriction enzymes and features. View how your construct will be put together and identify design flaws.
► Learn how to simulate restriction cloning in SnapGene
Sequence Verify Your Construct
Highly visual alignment of sequencing results to your simulated construct and simulation of agarose gel electrophoresis ensure accurate verification of your cloning results.
► Learn how to align to a reference sequence in SnapGene
Simulate Restriction Digest
Visualize exactly what you will see in the lab with SnapGene’s empirically-based gel simulation algorithm. Flexible configuration of all gel elements, including the number of lanes, % agarose, running time and a full set of MW markers. Record and identify your band of interest with detailed fragment information for each lane.
► Learn how to simulate an agarose gel in SnapGene
Learn More About Cloning
