The Plasmid Cloning Cycle
Introduction to Molecular Cloning
Molecular cloning has revolutionized biological research and medicine. The discovery and isolation of various bacterial enzymes, including restriction endonucleases in the 1950s and 1960s, propelled the beginnings of molecular cloning, and further development of innovative technologies such as Polymerase Chain Reaction (PCR), have contributed to advancements in techniques and applications.
► Learn more about Polymerase Chain Reaction
Today, researchers have at their disposal a variety of specialized cloning techniques that have many different applications. Uses of molecular cloning include:
- Studying gene and protein function and expression
- Clinical applications, including the discovery of therapeutic targets to treat disease and the development of improved vaccines
- Generation of transgenic organisms
What is Molecular Cloning?
Molecular cloning refers to the capture and isolation of a unique nucleic acid fragment (called an insert) to allow it to be grown and propagated away from the genome where it originated.
The general molecular cloning process is illustrated below (Figure 1). First, the DNA cloning vector/plasmid (in blue) and a genome (in grey) containing the DNA fragment of interest (in red) are cleaved with restriction endonucleases, resulting in the isolation of the DNA fragment. This fragment can then be introduced (ligated) to the DNA vector. The DNA vector containing the DNA fragment is called a “recombinant molecule” (or recombinant DNA). It can be transferred into a bacterial host that can produce many copies of recombinant DNA.

Features of a DNA Vector
The most common type of DNA vector is a bacterial plasmid, a small circular piece of DNA that grows in bacteria independent from the bacterial chromosome. Plasmids have multiple features that facilitate the cloning process.
- Multiple restriction sites (e.g., EcoRI) are indicated along the plasmid perimeter in the plasmid map. Restriction enzymes recognize these restriction sites and cleave the DNA at these points. They are essential for specific cloning methods.
- E. coli origin of replication or “ori” (in yellow) allows the plasmid to be replicated by E. coli’s DNA replication machinery, independently of the bacterial genome.
- Antibiotic resistance genes. pBR322, for example, has ampicillin and tetracycline resistance genes (green arrows) and associated promoters (white arrows). These resistance genes allow for the selection of plasmids. Expression of the proteins encoded by either resistance gene protects the bacteria when exposed to the related antibiotic,, while the bacteria that do not contain this plasmid die. These resistance genes are also called selectable markers. The type of selectable marker depends on the organism for which the plasmid is intended.

- Multiple Cloning Site or MCS is a polylinker with several restriction sites, making cloning easier by creating more flexibility for inserting DNA fragments into a plasmid without disrupting essential elements of the plasmid. In pUC19, for example, the MCS is indicated in blue (Figure 3) and contains a cluster of restriction enzymes you can use when cloning into this plasmid.

Scientists use different model organisms for biological research. These organisms include mice, zebrafish, frogs, and yeast. Because each organism’s biology varies vastly, specific and dedicated plasmids are needed to perform cloning and research in each unique organism. In other words, each organism requires vectors that contain features that allow their replication and gene expression in the model organism.
The Plasmid Cloning Cycle
Cloning requires multiple experimental steps, as summarized in the Plasmid Cloning Cycle.

Step 1: Manipulation of DNA
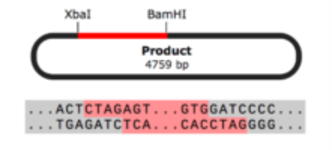
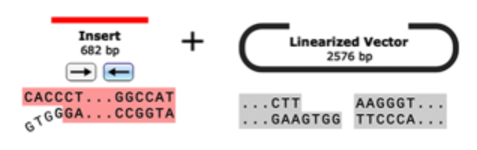
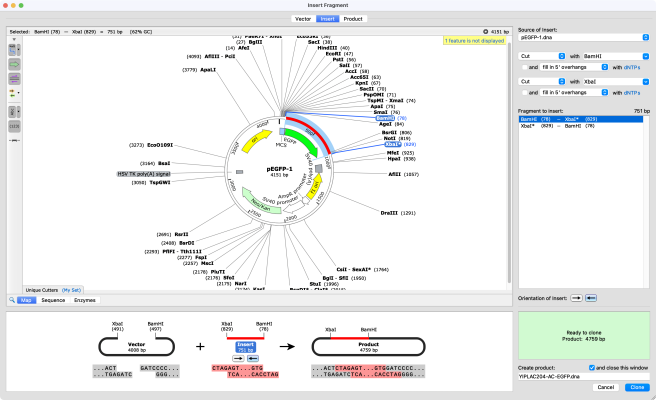
The first step is the manipulation of DNA to generate a novel recombinant DNA molecule, including a cloning vector with the DNA fragment of interest inserted. The classic approach to manipulating the plasmid and isolating the fragment of interest uses restriction enzymes.
A plasmid, cut with restriction enzymes, becomes linear. When the plasmid and DNA fragments are cut with the same restriction enzymes, they can be ligated back together using an enzyme called DNA ligase. The ligase “glues” fragments and the linearized plasmid together to generate a recombinant vector— a functional circular plasmid.

Step 2: Transformation
Next, recombinant DNA is introduced into bacterial cells through a transformation process that allows bacteria to make copies of the recombinant DNA.
Bacteria are beneficial for cloning because they can absorb genetic material from their environment. Scientists have optimized this process to facilitate cloning experiments. The most common transformation technique used in laboratories today utilizes chemically competent cells, which have been treated with calcium chloride to allow the attachment of plasmid DNA to the cell membrane. Another technique uses electroporation, which involves exposing the cells to an electrical field (a shock), which increases the permeability of the cell membrane and allows plasmids to enter the cell.
With either technique, chemical transformation or electroporation, a tiny proportion of cells are induced to take DNA from the surrounding environment.
Step 3: Selection and Screening
Once you have introduced the plasmid into the competent bacteria, the bacteria are allowed to rest before being plated on agar plates so they can grow and propagate. During selection, only cells that received a circularized plasmid during transformation will grow.
This selective growth is due to an antibiotic resistance gene contained in the plasmids, which, when expressed, allows the bacteria to grow in media containing antibiotics.
Three types of plasmids can result from cloning:
1. The vector can re-ligate back to itself (plasmid with no insert).
2. A fragment without the DNA of interest can ligate into the vector (plasmid with the wrong insert).
3. The DNA of interest fragment can ligate into the vector (plasmid with correct insert).
All these plasmids will promote the growth of bacteria in the presence of antibiotics. The next step is to determine which clones contain the correct insert by performing a blue-white screen.
Blue-white screening is a common screening technique, where the bacteria will appear blue or white depending on the presence of a plasmid. This is due to the plasmid containing a specific functional feature—LacZα. When LacZα is disrupted by cloning into the MCS, B-galactosidase is not produced, and the bacteria appear white instead of blue.

Step 4: Extraction from Bacteria
Once candidate clones are identified, small bacterial cultures are inoculated so that DNA can be extracted for analysis. Then using a DNA mini-prep, a rapid preparation of small amounts of plasmid DNA, the DNA is extracted. Currently, there are many DNA mini-prep kits available on the market that you can use.
Step 5: Clone Verification
After isolation of the DNA, you must verify which clones are the desired ones. There are multiple approaches to determine which clones are correct:
- Sequencing is an accurate method that easily validates clones by aligning the sequence of the clone to a reference sequence.
- Restriction digest requires the use of different restriction enzymes to cut the plasmid DNA at different sites. If your clone is correct, the resulting fragments will show that the insert is the correct and expected size.
- Diagnostic PCR

Finished Product
Depending on your cloning objective, you may proceed from steps 1 through 5 just once before proceeding with other aspects of your experiment. Other situations may require you to “cycle” through the steps until your project is complete. Thus we can represent the steps of the Cloning Cycle in a flow chart.

The decision points come after analyzing candidate clones for completeness and accuracy.
1. The clone is not correct > Start over at the manipulation of DNA step. You may need to troubleshoot.
2. The clone is correct, but further modification is needed > Manipulate the DNA again.
3. The clone is correct and is the desired finished product > In this case, you can proceed to other aspects of your experiment.
General Tips for Cloning Success
Tip 1: Respect Murphy’s Law
If anything can go wrong, it will. However, by following the tips shared here you may avoid any issues that may arise during cloning.
Tip 2: Understand the protocols and learn why each step is needed.
When starting to use a cloning protocol, you must understand what each step in the protocol accomplishes. As you become more familiar with the protocol and technique, you will learn which steps require more attention and precision, and which steps allow for more flexibility.
Tip 3: Prepare abundant and high-quality nucleic acids.
There is no substitute for good starting material with few contaminants. To obtain good-quality and abundant DNA, you must follow the DNA purification procedures carefully. Remember that it is easier to dilute something than to concentrate it. The quality of DNA is important, and you must ensure that the DNA is clean.
Tip 4: Accurately quantitate your nucleic acids.
Ensure that you are quantifying small volumes of DNA accurately.
Tip 5: Carefully store and handle DNA
Freeze DNA to protect it from UV and oxidative damage. Avoid prolonged exposure to shortwave UV (UVB) when purifying DNA from agarose gel. Use the longer wavelength UV option (UVA) or a non-UV lamp with the appropriate dye to avoid damaging DNA.
Tip 6: Understand molar ratios
Many protocols indicate the molar ratios needed, so you must understand the relationship between DNA mass and molar concentration. A DNA molecule’s mass is directly proportional to its length.
Tip 7: Learn to pipette as accurately as possible
The less deviation you introduce via pipetting, the better. Accurate pipetting leads to accurate measurements and strong replicates.
Tip 8: Double-check your work
For molecular biology experiments and cloning, you must double-check your calculations. In addition, learn what different volumes look like in your pipettors and Eppendorf tubes, and double-check your labels.
Tip 9: Save your reaction intermediates
Saving reaction intermediates during cloning is beneficial when unexpected mishaps occur. Saving leftovers from reactions allows you to repeat steps if necessary. For example, you may have made a mistake when performing the transformation protocol. If you saved part of the ligation reaction, you can go back and repeat the transformation as needed.
Tip 10: Safely store and accurately document your finished products
Most reagents have optimal storage conditions. Not following these guidelines can cause materials to degrade, resulting in experiment failure and wasted time and money.
Tip 11: Do not depend on kits
Kits are helpful when you understand what each step accomplishes. This is especially important when kits fail. Your understanding of the procedure will allow you to troubleshoot the problem effectively.
Tip 12: Simplify your cloning
If possible, minimize the steps in your cloning protocol. As more steps are involved, the chance of error, yield loss, mislabeling, and mutation increases.
Key Cloning Techniques
Restriction Enzyme Cloning
Restriction enzyme cloning is a common technique used to prepare inserts and vectors for cloning using restriction enzymes. Restriction enzymes allow you to cut a vector and an insert at specific locations, so they can be easily joined together by the enzyme DNA ligase to create recombinant DNA.
Gateway Cloning
Gateway cloning is a highly efficient alternative to restriction cloning that does not require the use of restriction enzymes. Instead, this two-step recombination process moves an insert into a vector by taking advantage of integration and excision reactions. Multisite Gateway cloning allows the insertion of up to four fragments simultaneously.
► Learn more about gateway cloning

Gibson Assembly
Gibson Assembly is an efficient and easy-to-use cloning method that does not require restriction enzymes. Multiple overlapping DNA fragments can be inserted into a plasmid in a single reaction.
► Learn more about Gibson assembly

In-Fusion Cloning
In-Fusion cloning is a versatile method for creating seamless gene fusions without the use of ligation. A linearized vector is mixed with one or more PCR products that have overlapping ends and are joined in a single step with the In-Fusion enzyme.
► Learn more about in-fusion cloning

TA Cloning
TA cloning is a simple cloning technique that does not require restriction enzymes. TA cloning utilizes the addition of A overhangs to the 3’ end of PCR products by DNA polymerase enabling ligation of these PCR products into vectors with complementary T overhangs.
► Learn more about PCR cloning

TOPO™ Cloning
TOPO™ and Life Technologies™ are trademarks of Thermo Fisher Scientific and its subsidiaries unless otherwise specified.
TOPO™ cloning allows PCR products to be rapidly joined to linearized plasmid vectors by the enzyme topoisomerase I, without the requirement for DNA ligase. There are three types of TOPO™ cloning - sticky-end TA cloning, blunt-end cloning and directional cloning.
► Learn more about TOPO™ cloning
SnapGene and the Plasmid Cloning Cycle
SnapGene offers a wide range of user-friendly tools that support and facilitate simple and complex cloning projects. With SnapGene, you can plan your cloning strategy, visualize the process, and document your work. SnapGene’s tools prevent you from making errors and wasting time at the bench.
SnapGene helps streamline your cloning:
1. Specialized cloning tools ensure fast, accurate construct design for all major molecular cloning techniques
2. Highly visual alignment of sequencing results to your simulated construct and simulation of agarose gel electrophoresis ensure accurate verification of your cloning results
3. Automatic documentation tools record your experimental procedures and create a graphical history
4. Data management tools allow storage, importing, sharing, and the organization of maps, files and sequences
Try simulating a molecular cloning experiment today with a SnapGene free trial.
Learn More About Cloning


