What is PCR Cloning?
PCR cloning is the capture of a PCR product into a vector of interest. There are two basic approaches to capturing a PCR product:
- Using restriction enzymes within your PCR product or added by primers
- Using TA or TOPO™ vectors which allow you to capture PCR products with few intermediary steps
Cloning PCR Products with Restriction Enzymes
A simple strategy to clone PCR products is to span restriction enzyme sites that already exist in your sequence. This approach is limited to any pre-existing restriction sites in your target and their compatibility with your chosen vector.

This map shows all the unique restriction enzymes that cut within or near the human EGFR promoter. To clone the complete promoter you are limited to the few enzymes at the very 3’ and 5’ ends, which may or may not be compatible with your chosen cloning vector.
However, it is routine to add restriction enzyme sites to the ends of PCR primers, making this a versatile approach to cloning PCR products.
Most restriction enzymes do not cut efficiently when located immediately at the end of a fragment, generally requiring 3 to 5 flanking nucleotides for optimal cleavage. A handy rule of thumb is to add an additional restriction enzyme site outside your chosen restriction enzyme sites.

Once you have successfully amplified your PCR product with your selected restriction enzyme sites, you would follow the typical steps to complete restriction enzyme cloning.
Steps include:
- Amplification of your fragment of interest with desired restriction enzyme sites added to your primers.
- Restriction enzyme digestion of your PCR product and vector.
- Band purification of your insert and vector
- Ligation, followed by transformation, selection, and the remaining steps of the cloning cycle.

Cloning PCR Products without Restriction Enzymes
TA and TOPO™ TA cloning™ are two similar and highly effective ways to directly clone PCR products without using restriction enzymes. Both of these techniques allow you to clone your PCR product directly with minimal additional steps. While dedicated vectors are not unlimited, there are many TOPO™ and T/A vectors to choose from, and several allow you to progress very quickly to the next phase of your experiment.
What is TA Cloning?
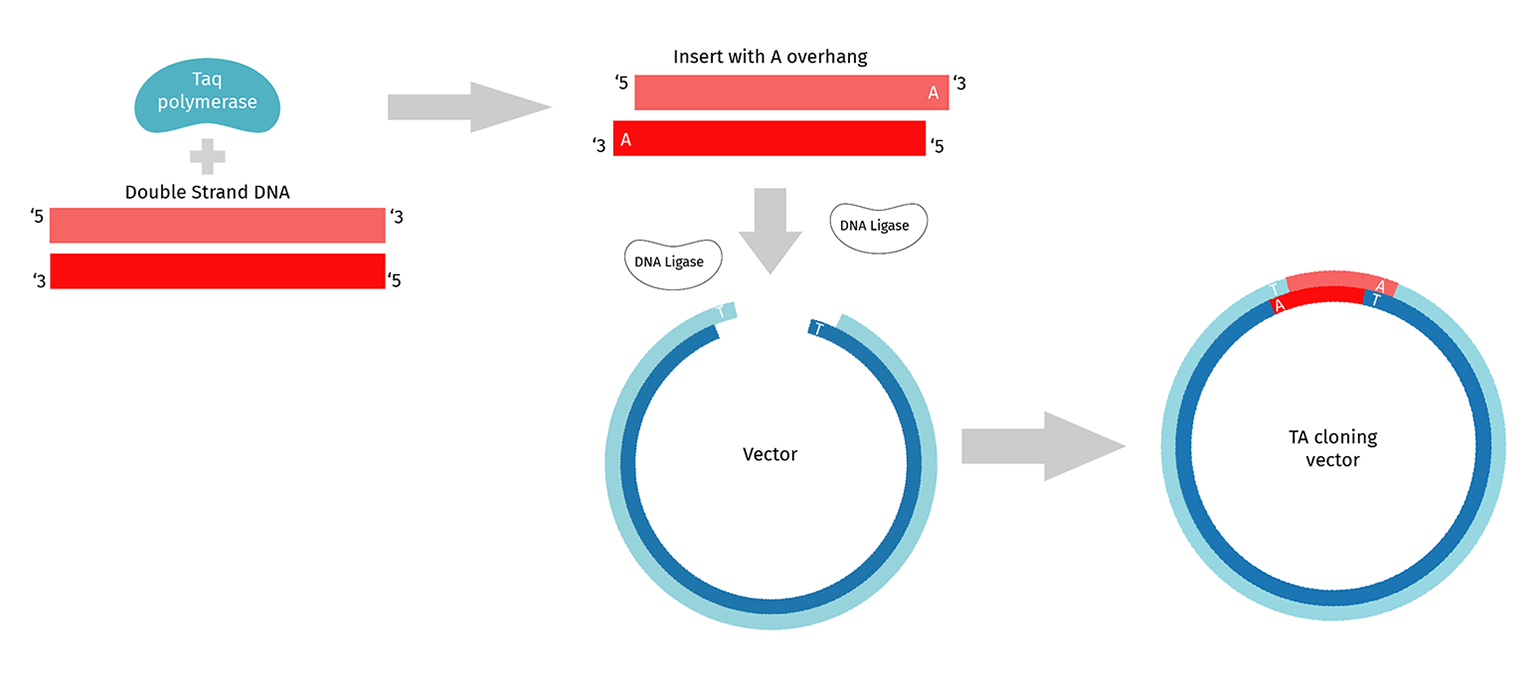
TA cloning requires the use of PCR enzymes that add an untemplated A to the 3' end of a complete PCR product. Standard Taq polymerase adds this untemplated A, as do many others. TA vectors are purchased as linear molecules with the 5’ T already added.
Like restriction enzyme cloning, standard T/A cloning uses DNA Ligase to join the insert and vector. The insert can ligate into the vector in either orientation, which you can resolve when sequencing your candidate clones. However, the overhang is a single T/A at either end of the insert-vector junction and hence is not very stable. Depending on the ligase you use, you may need to incubate the ligation for several hours.
► Simulate TA cloning in SnapGene

What is TOPO™ Cloning?
TOPO™ and Life Technologies™ are trademarks of Thermo Fisher Scientific and its subsidiaries unless otherwise specified.
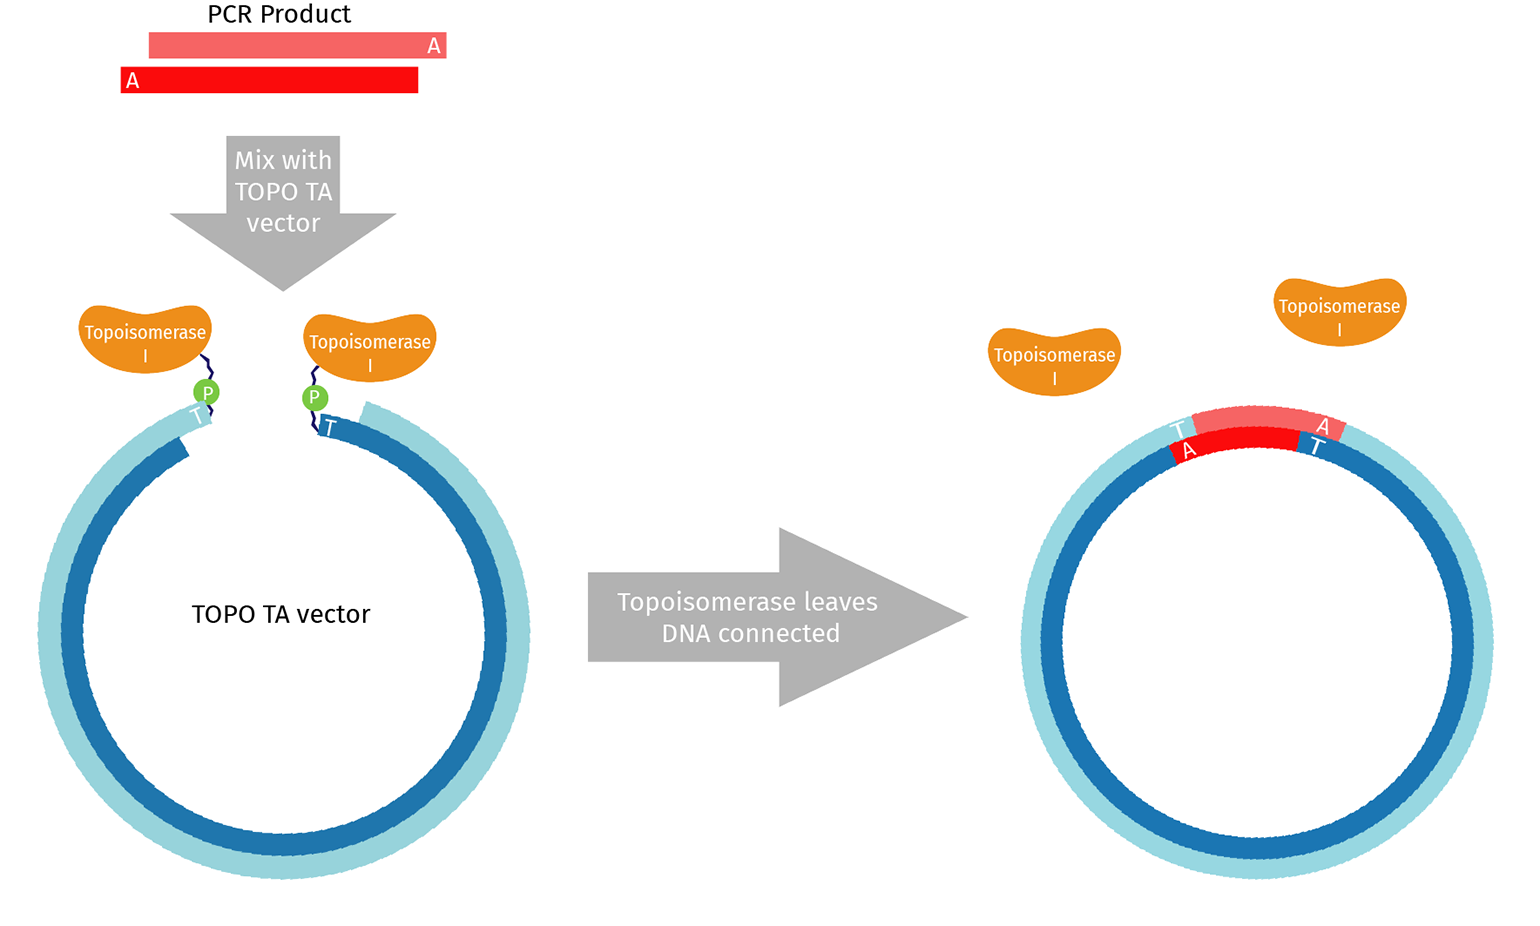
TOPO™ TA is an adaptation of standard TA cloning that uses the enzyme Topoisomerase I. In vivo, Topoisomerase I relieves excessive twisting that naturally occurs in DNA molecules by cutting one strand and passing the exposed end around, removing the twist. The final step is re-ligating the cut ends back together.
When purchased for use in the lab, topoisomerase is pre-assembled on both ends of a linearized TOPO™ vector. The topoisomerase/vector complex is poised to complete the re-ligation step once a suitable DNA substrate is provided.
As a result, TOPO™ cloning is generally very efficient with no background. A TOPO™ reaction can be transformed after a 5-minute incubation.
In addition, there are TOPO™ vectors that allow you to clone blunt-ended PCR products, or to clone your insert into a specific orientation using directional TOPO™ cloning.
► Simulate TOPO™ cloning in SnapGene

Cloning PCR Products Top Tips
In addition to good basic PCR habits, discussed in designing and performing PCR, there are some other specifics to bear in mind.
1. Choose the best PCR enzyme
Basic Taq polymerase will introduce an error once every 10,000 base pairs replicated. Mutations accumulate with each passing round of amplification so that by the end of 30 rounds of amplification, in which millions of base pairs are being copied per round, the odds of finding an unmutated product is less than 1 in 10.
There are several PCR enzymes on the market with 20x or greater fidelity than traditional Taq polymerase which are recommended for use when performing PCR for cloning.
In addition, keeping the rounds of PCR to a minimum, below 30, lowers the risk of mutations.
2. Choose the best vector
There are many choices of vectors when it comes to cloning PCR products. Many are pre-configured for a specific purpose ranging from protein expression and purification to creating Gateway Entry clones. Others do less functionally, but essentially put your PCR product in the middle of a Multi-cloning site. A little forethought now will likely save you time and money later.
3. PCR Clean Up
Most cloning reactions perform better with purified DNA fragments. The fastest and most common way to clean up PCR products is with PCR clean-up columns. PCR clean-up columns will remove 100% of enzymes, salts, and remaining dNTPs. There are some drawbacks to using PCR clean-up columns as they may not remove all your primers, template, or incorrect fragments.
The alternative to a PCR clean-up column is band purification. After running an agarose gel to isolate your PCR fragment, you will proceed with a clean-up procedure that is very similar to the direct PCR clean-up column, except the only thing you will be purifying is your fragment of interest.
4. Quantifying your fragment
Most cloning procedures require fairly accurate quantification of the material being used. If you are using a gel to quantify the amount of material in your PCR reaction, you will not need to purify it, but this is also contingent on whether clean-up is required for your next procedure. If you are using spectroscopy to quantify your PCR product, you should perform a clean-up reaction, since nucleotides have similar absorbance properties to nucleic acid polymers.
5. Always sequence your cloned PCR product
Even with the highest fidelity PCR polymerases, there is no guarantee of zero mutations, so sequencing of your complete cloned PCR reaction is recommended. Plan for your sequence validation when you order the PCR primers and order any additional primers at that time. If the PCR product is fairly long, be ready to sequence the complete product by ordering sequencing primers spaced roughly every 500 base pairs.
Simulating PCR Cloning in SnapGene
SnapGene allows you to accurately design and simulate PCR cloning procedures. Test complicated projects, catch errors before they happen, and obtain the right constructs the first time.
Import Plasmid Maps
SnapGene provides a library of commonly used TA and GC cloning vectors, which can be easily added directly into your cloning experiment.
► Watch how to import plasmids into SnapGene
Plan and Visualize Your Cloning
The simple interface and specialized cloning tools in SnapGene ensure fast, accurate construct design. Automatically design PCR primers, view how your construct will be put together and identify design flaws.
► Watch how to simulate TA cloning in SnapGene
Sequence Verify Your Construct
Highly visual alignment of sequencing results to your simulated construct and simulation of agarose gel electrophoresis ensure accurate verification of your cloning results.
► Watch how to align to a reference sequence in SnapGene
Learn More About Cloning


